Hi folks !
Here is a small R&D project I've been working on: Gaia Scatter. It's a toolset made of few digital assets driven by a Python interface which helps you to scatter objects on a terrain.
It allows you to have the flexibility of painting combined with the power of procedural rules.
As it's asset-based you still have a full control on what's going on. No black box here.
As said, it's still WIP / R&D and I'll test more features soon such as LOD system according to the position of the camera, variation in shaders, dynamic object layers, etc... I'll post updates of the tool here.
In the meantime, you can find the first video on my vimeo account as well as the source code / digital assets on my github ( not very commented yet tho ... ).

Showing posts with label Python. Show all posts
Showing posts with label Python. Show all posts
Tuesday, March 7, 2017
Friday, December 30, 2016
Helpcard maker for Houdini
Help card maker for houdini from Cetras on Vimeo.
Changelog:
0.9.4:
- Fix folders and multiparms random order.
- Only one instance per multiparm is added to the parameters help grid.
- Added handles on the left side of widgets to reorder widgets.
This is the first version of "Helpcard maker" for Houdini 14 to houdini 15.5.
To install it follow these steps:
- Download the lastest zip archive of the tool on my github deposit:https://github.com/GJpy/HelpCardMaker/raw/master/HelpCardMaker.zip ( github => GJpy )
- Go to your HOME folder/houdiniXX.x and unzip the file in here, you should have now few new files and folders:
scripts/python/HelpCardMaker
Changelog:
0.9.4:
- Fix folders and multiparms random order.
- Only one instance per multiparm is added to the parameters help grid.
- Added handles on the left side of widgets to reorder widgets.
This is the first version of "Helpcard maker" for Houdini 14 to houdini 15.5.
To install it follow these steps:
- Download the lastest zip archive of the tool on my github deposit:https://github.com/GJpy/HelpCardMaker/raw/master/HelpCardMaker.zip ( github => GJpy )
- Go to your HOME folder/houdiniXX.x and unzip the file in here, you should have now few new files and folders:
scripts/python/HelpCardMaker
config/Icons/helpcardmaker.png
- Launch Houdini, you'll have the Helpcard maker pypanel available and should be able to directly add a help card maker tab.
Any issue or install troubles, feel free to drop an email: contact@guillaume-j.com.
This is the first release of the tool, a lot of new features will be added shortly such as link to other pages, vimeo video, new widgets and more !
python_panels/HelpcardMaker.pypanel
- Launch Houdini, you'll have the Helpcard maker pypanel available and should be able to directly add a help card maker tab.
Any issue or install troubles, feel free to drop an email: contact@guillaume-j.com.
This is the first release of the tool, a lot of new features will be added shortly such as link to other pages, vimeo video, new widgets and more !

Thursday, December 18, 2014
Demoreel update !
Hi folks,
Here is my latest updated demoreel where I show works I have done as Lighting / Comp TD or Pipeline TD, more update to come soon !
Here is my latest updated demoreel where I show works I have done as Lighting / Comp TD or Pipeline TD, more update to come soon !
Sunday, October 5, 2014
PyTake2 create take using python in Houdini
PyTake is now completely rewritten, new version is now fully object oriented. It allows the user to create and edit takes in houdini using python.
It works with all version of Houdini (Apprentice, Apprentice HD, escape, master or Indie.) Free for all usage ( comercial or not ).

To create a new take, just instance a new Take() object :
import PyTake2 as pt
# This will create a new take and add it to the take list
myTake = pt.Take('mytake')
#This will include the display flag of the node « /obj/grid/grid1 » to the take.
myTake.includeDisplayFlag('/obj/grid/grid1')
# You can also use a hou.Node() as parameter :
node = hou.node('/obj/sphere/sphere1')
myTake.includeDisplayFlag(node)
# To include all parms of a node to the take, use :
myTake.includeParms(node)
# To add only some parameters, use :
myTake.includeParms(node, parms_dict={'radx':None, 'rady':None, 'radz':None))
# To add only some parameters, and set node's parameters values use :
# This will set radx to 5, rady to 1 and radz to 2 in the take.
myTake.includeParms(node, parms_dict={'radx':5, 'rady':1, 'radz':2),set_parms_value=True)
#To exclude parms from the take, use :
myTake.includeParms(node, parms_dict={'radx':None, 'rady':None, 'radz':None},include=False)
# To copy a take
copy_take = myTake.copy()
# => this create a new take name_copy
# To remove a take :
myTake.remove()
It works with all version of Houdini (Apprentice, Apprentice HD, escape, master or Indie.) Free for all usage ( comercial or not ).
To create a new take, just instance a new Take() object :
import PyTake2 as pt
# This will create a new take and add it to the take list
myTake = pt.Take('mytake')
#This will include the display flag of the node « /obj/grid/grid1 » to the take.
myTake.includeDisplayFlag('/obj/grid/grid1')
# You can also use a hou.Node() as parameter :
node = hou.node('/obj/sphere/sphere1')
myTake.includeDisplayFlag(node)
# To include all parms of a node to the take, use :
myTake.includeParms(node)
# To add only some parameters, use :
myTake.includeParms(node, parms_dict={'radx':None, 'rady':None, 'radz':None))
# To add only some parameters, and set node's parameters values use :
# This will set radx to 5, rady to 1 and radz to 2 in the take.
myTake.includeParms(node, parms_dict={'radx':5, 'rady':1, 'radz':2),set_parms_value=True)
#To exclude parms from the take, use :
myTake.includeParms(node, parms_dict={'radx':None, 'rady':None, 'radz':None},include=False)
# To copy a take
copy_take = myTake.copy()
# => this create a new take name_copy
# To remove a take :
myTake.remove()
Sunday, September 21, 2014
Maya / Houdini Python live connection
I'm playing a bit with rpc module and python. Here is a little example of what I've tried so far, a live connection between Maya and Houdini.
Maya looks up for Houdini start up and then connects its python to Houdini's automatically. Thanks to that, in this video, I create a "live connected" camera and I can also send meshes directly from Maya to Houdini ( and vise versa ).
This needs the rpyc module for Python 2.7 ( it is also included with Houdini ), you can downloaded it at this adress : http://rpyc.readthedocs.org/en/latest/
Maya looks up for Houdini start up and then connects its python to Houdini's automatically. Thanks to that, in this video, I create a "live connected" camera and I can also send meshes directly from Maya to Houdini ( and vise versa ).
This needs the rpyc module for Python 2.7 ( it is also included with Houdini ), you can downloaded it at this adress : http://rpyc.readthedocs.org/en/latest/
Here is the source code for the connection Maya => Houdini. It must be saved in the scripts folder of maya and used as followed from a Python shelf tool:
import MayaModule
ui = MayaModule.MayaConnectionUI()
ui.show()
You can copy the icons green_light.png and red_light.png in a folder "icons" saved in the same place as the python file.
On the Houdini side, you must have a Python file called "123.py" (or hescape.py if you use Houdini Escape ) withthese two lines of code in it:
import hrpyc
server = hrpyc.start_server(port=18812)
Tuesday, August 5, 2014
Powerful method hou.hipFile
Just a quick arcticle to speak a bit about the not well known but powerful python class hou.hipFile.
It allows you to have access, open, edit, save, merge hip file from python. For instance, you could drive Houdini from an external python tool without opening Houdini at all.
You have access then to all python methode of the Houdini module. You can export geos, do mantra rendering, create / manipulate object and otls etc.
For instance the code bellow, we will open the hip file "houhipfile.hip" and export the geo which is in that file tanks to a rop_output node, (warning this does not work with houdini apprentice):
# Here we setup the path to the HIP file as well as where you want to export the bgeo file.
PATH = r"H:/houhipfile.hip"
OUTPUT_GEO = r"H:/teapot.bgeo"
# Here we load the hip file.
hou.hipFile.load(PATH)
# Then we fetch the rop output node
ropNode = hou.node("obj/outputGeo/rop_output")
# We change the Ouput path parameter
ropNode.parm("sopouput").set(OUTPUT_GEO)
# We do the render ( exporting the geo )
ropnode.render()
# And finally we clean the current houdini session
hou.hipFile.clear()
This could be launched from any python tool, with a nice UI in PyQt for instance.
Instead of opening a hip file, you could of course create nodes from scratch:
root = hou.node("/obj")
geo = root.createNode("geo")
and then you have access to the geo node's parms, etc.
More infos here => hou.hipFile class help
And you can download the hip file as example here
It allows you to have access, open, edit, save, merge hip file from python. For instance, you could drive Houdini from an external python tool without opening Houdini at all.
You have access then to all python methode of the Houdini module. You can export geos, do mantra rendering, create / manipulate object and otls etc.
For instance the code bellow, we will open the hip file "houhipfile.hip" and export the geo which is in that file tanks to a rop_output node, (warning this does not work with houdini apprentice):
# Here we setup the path to the HIP file as well as where you want to export the bgeo file.
PATH = r"H:/houhipfile.hip"
OUTPUT_GEO = r"H:/teapot.bgeo"
# Here we load the hip file.
hou.hipFile.load(PATH)
# Then we fetch the rop output node
ropNode = hou.node("obj/outputGeo/rop_output")
# We change the Ouput path parameter
ropNode.parm("sopouput").set(OUTPUT_GEO)
# We do the render ( exporting the geo )
ropnode.render()
# And finally we clean the current houdini session
hou.hipFile.clear()
This could be launched from any python tool, with a nice UI in PyQt for instance.
Instead of opening a hip file, you could of course create nodes from scratch:
root = hou.node("/obj")
geo = root.createNode("geo")
and then you have access to the geo node's parms, etc.
More infos here => hou.hipFile class help
And you can download the hip file as example here
Tuesday, May 6, 2014
Tutorial: Python sop in houdini [ENG/FR]
French Follows!
The idea of this article is to show how to use Python in Houdini for the creation of SOP node. In order to follow this short tutorial you should know basic of Python as well as Houdini ( SOP nodes, digital assets création ... ).
You can find a ready to go otl Here, and you can download the python source code Here.
We're going to create an otl via Python which will be able to return in a point attribute the value of the angle between each edges of a ordered curve.
I insiste on that point, the curve must be ordered ! that means points order must follow the direction of the curve. To order curve's points you have multiple possibilities like sort node, nurbs UV, pathfinding etc. This might be the subject of another article later on.
This tool could be created throught vex or with normal nodes of houdini, but the point of this tutorial is to show how python works in Houdini :)
There are multiple ways to use Python in Houdini, here, we'll create a SOP node by Python.
First, we'll create that node, which is actually nothing else than a digital asset. Use the menu "File => new operator type", then select type: "Python" and "Geometry node" ( it means "SOP node" actually ).
Don't forget to put a name an label just like an normal digital asset.
A window similar to digital asset création opens, the difference is that the tab "Code" is available. This is where we will write our code.
You can see that Houdini write for us a bit of starting code :)
# This code is called when instances of this SOP cook.
node = hou.pwd()
geo = node.geometry()
# Add code to modify the contents of geo.
Houdini write what is needed in order to fetch the geometry and the node you need.
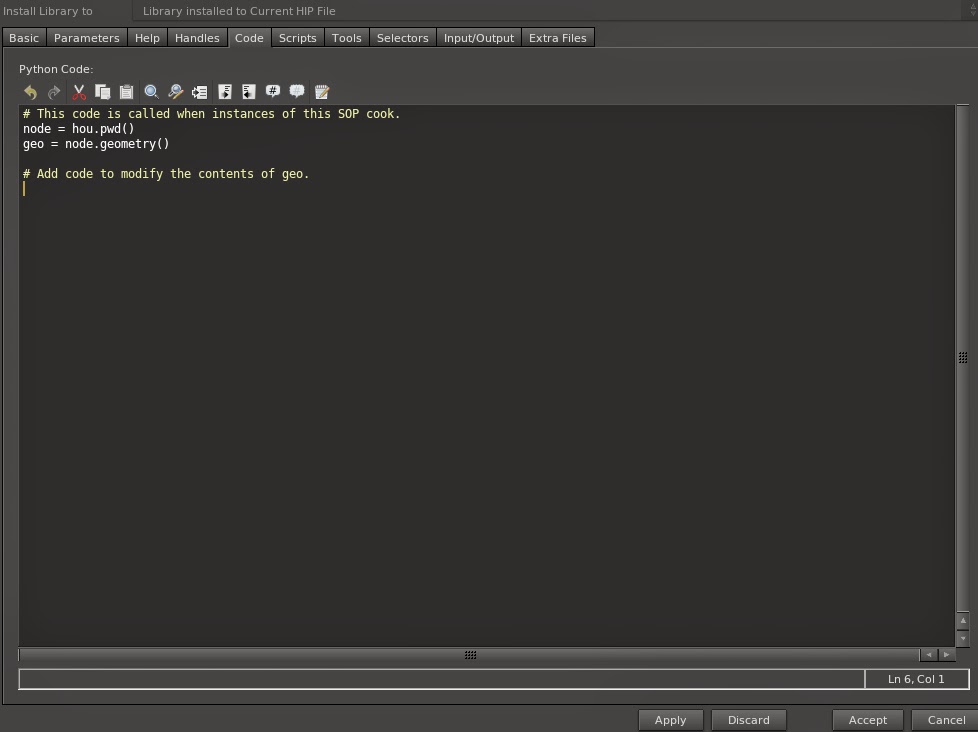
node = hou.pwd() => creates a reference to the current node ( our otl )
geo = node.geometry() => creates a reference of the geometry of the current node, this is where you can modify the actual geometru ( points, vertex, prim etc. ).
We will create also 2 parameters:
One float called "threshold" with a range from 0 to 180 and a default value at 120.
One String called "groupname", with a default value "anglegroup".

You can download the source code here, we'll have a look on that line after line:
First of all, we import all the python modules needed. You can import you custom modules as well, as long as they are saved in a folder scanned by Houdini.
import math
import numpy
As seen, we create here a reference to the current node, as well as the current geometry
The line "points = geo.points()" returns a list of all points in the current geometry.
node = hou.pwd()
geo = node.geometry()
points = geo.points()
Here we save in a variable "_threshold" the value of the parameter "threshold" exposed in our UI.
_threshold = node.evalParm("threshold")
Then we create a point group, empty for the moment and which will have the name found in the parameter "groupname".
grp = geo.createPointGroup( node.evalParm("groupname"))
We create an attribute type point which will have as name "angle" and as default value -1.0. This will allow us to save, for each points, the value of the angle found. For points which won't have angle values the attribute value will be -1.0. ( We will see later on that it's in fact, extremities of the curve)
attr = geo.addAttrib(hou.attribType.Point, "angle", -1.0)
It's here that we start to compute the angle value for each edges. We have to compute the angle between each vector 0 => 1, 2 => 1, 1 => 2, 3 => 2 etc...

Let's do a bit of math ! We have 3 points p0, p1, p2, the vector v0->1 will be compute as followed:
vx = p0x - p1x
vy = p0y - p1y
vz = p0z - p1z
Where p0x is the position.x of the point 0 etc.
For each points of the curve, we will use the current point ( i ) and also the point before ( i-1 ) and the point after ( i+1 ) on the curve.
So we will start the loop at 1 in order to skip the first point ( which is the point[0] ) and ends it at (length of the list -1) in order to skip the last point:
for i in range(1, len(points)-1):p1 = points[i-1]
p0 = points[i]
p2 = points[i+1]
Using the method Hou.Point.attribValue(name) we can access to the position values of each points. As the attribute is a vector(x,y,z) we can fetch each values separately for each points:
p0x = p0.attribValue("P")[0]
p0y = p0.attribValue("P")[1]
p0z = p0.attribValue("P")[2]
p1x = p1.attribValue("P")[0]
p1y = p1.attribValue("P")[1]
p1z = p1.attribValue("P")[2]
p2x = p2.attribValue("P")[0]
p2y = p2.attribValue("P")[1]
p2z = p2.attribValue("P")[2]
Then we calculate the vector coordinates and put them in a numpy.array()
v1 = numpy.array([p0x - p1x, p0y - p1y, p0z - p1z])
v2 = numpy.array([p0x - p2x, p0y - p2y, p0z - p2z])
Some more math ! The angle between 2 vector in radian is found by:
acos( dot(normalize(v1), normalize(v2)))
In our case the line "v1 = v1/numpy.linalg.norm(v1)" normalize our vector v1.
and "numpy.dot(v1, v2)" returns the dot product of there 2 vectors.
then, "Math.acos(x)" will return the angle in radian where x is the dot product result.
finally math.degrees(x) will convert radian value to degres angle value.
out = math.acos(numpy.dot(v1/numpy.linalg.norm(v1), v2/numpy.linalg.norm(v2)))
out = math.degrees(out)
We save the angle value in the point attribute we created:
points[i].setAttribValue(attr, out)
And as bonus, if the angle found is smaller than the threshold value, we put the current point in the point group we created.
if out < _threshold:
grp.add(points[i])
Et voilà ! Our node is ready to be used ! We could've add some other options like change the threshold test via an option "greater than or smaller than", expose a string parameter for the name of the attribut angle etc.
The node is in the tab menu at SOP level only, ready to go :)
Any questions or comments: contact@guillaume-j.com !
-----------------------------------------------------------------------------------------------------------
L'idée de ce billet est de présenter un peu l'utilisation de Python dans houdini au niveau SOP object. Ce court tutorial part du principe que vous connaissez déjà les rudiments de Python ainsi qu'Houdini (Nodes SOP, création de digital assets etc.).
Vous pouvez trouver ici un digital asset pré-fait, ainsi que le code source python ici.
Nous allons créer un otl en python qui sera capable de retourner dans un point attribute la valeur de l'angle observé entre chaques edges d'une courbe ordonnée.
J’insiste sur ce point: la courbe doit être ordonnée, c'est a dire que les points de la courbe suivent le sens de la courbe elle-même. Pour ordonner une courbe de points qui aurait des points générés de façon aléatoire, plusieur solutions s'offrent à avous: sort node via attribut, nurbs UV, path finder etc. Ceci fera peu être l'objet d'un autre billet sur ce blog.
Cet outil pourrait être créé avec des nodes "normaux" d'houdini et / ou du vex sans aucuns doutes. Mais l'idée de ce billet est bien de voir comment fonctionne Python dans Houdini :)
Il existe plusieurs façons d'utiliser Python dans Houdini, nous allons voir comment créer ici un SOP node custom en python.
Tout d'abord, créer ce fameux node qui sera en faite un digital asset (otl), par le billet du menu File => new operator type.
Selectionnez le type "Python", et également le type "Geometry node" qui correspond au niveau SOP.
N'oubliez pas de mettre un label et un nom comme un digital asset normal et sauver le.
Une fenêtre comparable à la fenêtre de création de digital assez s'ouvre, la différence est que le tab "Code" est disponible, c'est ici qu'on va pouvoir écrire le code Python.
Vous pouvez d'ailleurs voir qu'on code par défaut a été écrit:
# This code is called when instances of this SOP cook.
node = hou.pwd()
geo = node.geometry()
# Add code to modify the contents of geo.
En effet, Houdini écrit pour nous les bases nécessaires à la création de notre node:

node = hou.pwd() => créer une référence au node courant ( notre otl ).
geo = node.geometry() => créer une référence à la géometry courante, c'est ici que sont fait toutes les manipulation sur la géometrie de notre input, au niveau vertex, points, primitives etc.
Nous allons également créer un paramètre "threshold" en float avec un range de 0 à 180, qui nous sera utile par la suite.
Créez également un paramètre string "groupname" avec en valeur par défault "anglegroup".

Vous pouvez télécharger le code source du node ici. Nous allons détaillé ce code ligne par ligne:
Tout d'abord on importe les modules nécessaires, math et numpy. Vous pouvez ici importer toutes sortes de module, interne à Pyhton ou écrites par vous même si elles sont placées dans un dossier scanné par houdini.
import math
import numpy
Comme vu plus haut, on créer des références au node courrant ainsi qu'à la géométrie courante.
La ligne "points = geo.points()" retourne une liste contenant tout les points de la géométrie.
node = hou.pwd()
geo = node.geometry()
points = geo.points()
Ici nous allons enregistrer dans une variable "_threshold" la valeur de notre paramètre threshold qui sera exposé dans l'interface de notre otl.
_threshold = node.evalParm("threshold")
Nous créer ensuite un group de points ( pour le moment vide ), et qui aura comme nom la valeur de notre paramètre "groupname"
grp = geo.createPointGroup( node.evalParm("groupname"))
A cette ligne nous créons un attribute de type point qui aura pour nom "angle" et comme valeur par défaut -1.0. Cela nous permettra de sauvegarder, pour chaque points, la valeur d'angle que l'ont va trouver dans cet attribute. Pour les points qui n'auront pas de valeur d'angle, l'angle restera à -1. ( Nous verrons plus loin qu'il s'agit en faite des extrémités de la courbe.
attr = geo.addAttrib(hou.attribType.Point, "angle", -1.0)
C'est ici que l'ont commence à calculer l'angle pour chaque edge. Il s'agit de calculer l'angle entre les vecteurs entre les points 0 et 1 et 2 et 1, 1 et 2 et 3 et 2 etc...

Un peu de math ! Nous avons 3 points p0, p1, p2, le vecteur v0->1 sera calculé de la sorte:
vx = p0x - p1x
vy = p0y - p1y
vz = p0z - p1z
Ou p0x est la position en x du point 0 etc...
Pour chaque point de la courbe nous allons traiter le point courant ( i ), mais également le point d'avant ( i-1 ) et le point d'après ( i+1 ) sur la courbe. Nous allons donc faire commencer la boucle à 1 pour ignorer le premier point ( qui aura donc une valeur par défaut d'angle de -1.0) et la finir à la longeur de la liste - 1 pour ignorer également le dernier point de la courbe.
for i in range(1, len(points)-1):
Ici nous mettons dans des variables px les points correspondants.
p1 = points[i-1]
p0 = points[i]
p2 = points[i+1]
Grâce à la méthode Hou.Point.attribValue(name) nous pouvons accéder aux valeur de position de chaque points, comme l'attribut en question est de type vector(x,y,z) nous pouvons récupérer les valeurs d'x, y et z séparéments pour chacun des trois points:
p0x = p0.attribValue("P")[0]
p0y = p0.attribValue("P")[1]
p0z = p0.attribValue("P")[2]
p1x = p1.attribValue("P")[0]
p1y = p1.attribValue("P")[1]
p1z = p1.attribValue("P")[2]
p2x = p2.attribValue("P")[0]
p2y = p2.attribValue("P")[1]
p2z = p2.attribValue("P")[2]
Nous calculons ensuite les coordonnées des vecteurs qui nous intéressent et les mettons dans une variable numpy.array().
v1 = numpy.array([p0x - p1x, p0y - p1y, p0z - p1z])
v2 = numpy.array([p0x - p2x, p0y - p2y, p0z - p2z])
Encore des math ! L'angle en radian entre deux vecteurs est calculé comme ceci:
acos( dot(normalize(v1), normalize(v2)))
Dans notre cas la ligne "v1 = v1/numpy.linalg.norm(v1)" normalise notre vecteur v1.
Puisqu'on utilise le module numpy, numpy.dot(v1, v2) retournera le dot product nécessaire.
Math.acos(x) retournera la valeur en radian en partant d'un valeur x ( généré par notre dot product précédent )
Pour finir, math.degrees(x) convertie une valeur x en radian en une valeur d'angle en degrés.
out = math.acos(numpy.dot(v1/numpy.linalg.norm(v1), v2/numpy.linalg.norm(v2)))
out = math.degrees(out)
Nous enregistrons la valeur trouvée d'angle dans l'attribut "angle" créé précédemment.
points[i].setAttribValue(attr, out)
Et en bonus, si l'angle trouvé est inférieur à l'angle indiqué dans le paramètre threshold, nous ajoutons le point courant dans le group créer au début du node.
if out < _threshold:
grp.add(points[i])
Et voilà notre node est prêt à être utilisé ! Nous aurions pu ajouter d'autres options comme changer le test du treshold via un paramètre ( greater than, or smaller than ), un paramètre exposé pour le nom de l'attribut angle etc.
Votre node se trouve maintenant dans le menu tab si vous êtes en SOP level ! :)
Des questions ou remarques: contact@guillaume-j.com !
Wednesday, April 9, 2014
Houdini OTLcheck python script
Here is a simple python script for Houdini, OTLCheck
 This script allows the user to check which sub-otl(s) are used inside a selected otl.
It checks all sur subchildren nodes and will print a list of otls and path in the console or in the python shell.
If the otl uses a uncomplete asset definition the script will output a warning:
WARNING: node <node path>, is embedded.
The script skips all otls lib built-in shipped with Houdini.
It checks all sur subchildren nodes and will print a list of otls and path in the console or in the python shell.
If the otl uses a uncomplete asset definition the script will output a warning:
WARNING: node <node path>, is embedded.
The script skips all otls lib built-in shipped with Houdini.
Saturday, February 8, 2014
Houdini OTL: Layered Texture
Here is a new little asset, still work in progress, Layered Texture.
Allows the user to create a texture map made of multiple layers inside a material.

Parameters:
- 1 Main layer called "base map", UVs built switch with transforms for main layer
- Layers:
Layer 0 on top of main layer ( generated by default )
Add / remove / clear layers button to add layers.
Enable / Disable layer checkbox
Mode: Multiply, Substract, Mix and Add
UVs transformation for each layers
Layers are comped on top of each other: L2 on L1 (...) on L0 on MAIN.

Python source code available here
Allows the user to create a texture map made of multiple layers inside a material.
Parameters:
- 1 Main layer called "base map", UVs built switch with transforms for main layer
- Layers:
Layer 0 on top of main layer ( generated by default )
Add / remove / clear layers button to add layers.
Enable / Disable layer checkbox
Mode: Multiply, Substract, Mix and Add
UVs transformation for each layers
Layers are comped on top of each other: L2 on L1 (...) on L0 on MAIN.
Python source code available here
Wednesday, November 27, 2013
Python SOP node: Connectivity merge groups
Here is a custom python SOP node which merges groups together if they are not connected to each other.

Pattern: Groups used as input
Ouput Groups: Create new groups with merges groups
Keep Old: Keep old groups
If interested the python source code is availaibe here: Python Source Code
Download Connectivity Merge Groups
Parameters:Pattern: Groups used as input
Ouput Groups: Create new groups with merges groups
Keep Old: Keep old groups
If interested the python source code is availaibe here: Python Source Code
Sunday, July 7, 2013
GJ Isolate Selection ( Houdini )
Here is another utiliy: Isolate selection for Houdini

This python script allows the user to isolate an object ( by hiding all others ). Then to display back the objects when you exit the isolate mode.
The script keeps in memory which nodes were displayed or hidden before the isolate process. ( it uses a hou.session python module ).
Python Script for Houdini
How to use:
- Copy the .py file in "C:\Program Files\Side Effects Software\Houdini XX.X.xxx\python26\lib" or whatever python folder used by Houdini
- Create a new tool in a shelf: Right-clic -> new tool
- In tab "Script" write these two lines:
import IsolateSelection
reload(IsolateSelection)
Select an object to isolate that object by a clic on the tool just created, clic again on that tool to display back all other nodes.

This python script allows the user to isolate an object ( by hiding all others ). Then to display back the objects when you exit the isolate mode.
The script keeps in memory which nodes were displayed or hidden before the isolate process. ( it uses a hou.session python module ).
Python Script for Houdini
How to use:
- Copy the .py file in "C:\Program Files\Side Effects Software\Houdini XX.X.xxx\python26\lib" or whatever python folder used by Houdini
- Create a new tool in a shelf: Right-clic -> new tool
- In tab "Script" write these two lines:
import IsolateSelection
reload(IsolateSelection)
Select an object to isolate that object by a clic on the tool just created, clic again on that tool to display back all other nodes.
Monday, November 26, 2012
PyTakes for Houdini
Hi everybody,

As I don't really like the hscript command hou.hscript in order to drive takes creation in houdini, I decided to create my own python module for that.
So here is the really first version of the module, you can drive takes creation, remove, setup, etc. by python.
In the help .pdf you can find fonctions already implemented :
How to use:
Just copy the PyTakes.py file in "houdini_Install_Dir/houdini/python2.6libs" then in houdini juste import the module as normal python module with "import PyTakes".
Exemple to create a new take called "occlusion" and assign few parameters on this take:
#Import the PyTakes module
import PyTakes as pt
#Create a new take and change the current take to that new take
pt.createTake("occlusion", change=True)
#Include parameters "shading_quality" and "occlusion_shader" of object "groundGeo" to the current take.
pt.includeParm("obj/groundGeo", ["shading_quality","occlusion_shader"] )
#Include display flag to the current take and set it to "True"
pt.includeDisplayFlag("obj/groundGeo", autoSet=True, value=True)
The script allows list as input for object and parameters:
#Include parameters "shading_quality" and "occlusion_shader" of objects geo1 and geo2
#If an object or a parameters is not found, it will be skipped ( a warning promps if verbose=True )
pt.includeParm("[obj/geo1",obj/geo2"], ["shading_quality","occlusion_shader"] )

As I don't really like the hscript command hou.hscript in order to drive takes creation in houdini, I decided to create my own python module for that.
So here is the really first version of the module, you can drive takes creation, remove, setup, etc. by python.
In the help .pdf you can find fonctions already implemented :
How to use:
Just copy the PyTakes.py file in "houdini_Install_Dir/houdini/python2.6libs" then in houdini juste import the module as normal python module with "import PyTakes".
Exemple to create a new take called "occlusion" and assign few parameters on this take:
#Import the PyTakes module
import PyTakes as pt
#Create a new take and change the current take to that new take
pt.createTake("occlusion", change=True)
#Include parameters "shading_quality" and "occlusion_shader" of object "groundGeo" to the current take.
pt.includeParm("obj/groundGeo", ["shading_quality","occlusion_shader"] )
#Include display flag to the current take and set it to "True"
pt.includeDisplayFlag("obj/groundGeo", autoSet=True, value=True)
The script allows list as input for object and parameters:
#Include parameters "shading_quality" and "occlusion_shader" of objects geo1 and geo2
#If an object or a parameters is not found, it will be skipped ( a warning promps if verbose=True )
pt.includeParm("[obj/geo1",obj/geo2"], ["shading_quality","occlusion_shader"] )
Saturday, October 20, 2012
GJ Maya - Nuke Versioning
Hi all,

I'm working on a new python script which allows the user to increment output folder in maya for versioning.
The script works by Maya project it changes the image output folder according to the version you created / selected in the UI.
The first part of the script is available for testing ( see bellow, in beta ), I'm working on the Nuke side, which will allow the user to update reader nodes according to versions setuped in Maya. More informations soon.
To use it, open it with script editor in maya. You can drag and drop it on a shelf.
Features:
- Creation of "normal" version automatically ( v_00, v_01, v_02, etc. )
- Creation of custom name version
- Delete version / make a new version as current version
- Display the current project name and version in a Head up display
I'm working on a new python script which allows the user to increment output folder in maya for versioning.
The script works by Maya project it changes the image output folder according to the version you created / selected in the UI.
The first part of the script is available for testing ( see bellow, in beta ), I'm working on the Nuke side, which will allow the user to update reader nodes according to versions setuped in Maya. More informations soon.
Download the script for Maya ( right clic: Save as )
Features:
- Creation of "normal" version automatically ( v_00, v_01, v_02, etc. )
- Creation of custom name version
- Delete version / make a new version as current version
- Display the current project name and version in a Head up display
Saturday, August 4, 2012
GJ Text Filter
Hi all,

Here is a new python script for maya : Text Filter.


This tool allows the user to select, hide, delete etc. Objects according to a "Text Filter" ( acting like SideFX Houdini's filter ).

GJ Text Filter v 1.0.0
How to install:
Copy the .py and .ui file in your "userFolder/documents/maya/mayaVersion/scripts"
Open a script editor then in a new python tab type:
import selectByFilter
reload(selectByFilter)
from selectByFilter import *
ui.show(uiPath)
Then execute it, you can also drag and drop these lines to a shelves and use the .png icon.
How the Text Filter works with the * char:
- "*" means all objects
- "*red*" means all object's with a name including the word red ( "Character_red_01", "reddish_object", "red" etc.)
- "*blue" means all object's with a name finishing by "blue" ( "Character_blue", "Flower_blue", "blue" etc.)
- "green*" means all object's with a name starting by "green" ("green_grass","green_land","green")
- "word" means only the object which has this name ("word")
The background of the text filter field color :
- Grey if no object matches the filter
- Light Green if one object matches the filter
- Green if two or more object match the filter
Other options:
Show and Hide button to hide and show objects by categories, allows also the user to isolate the selected object.
About button to have information about the tool and check update online.
Version History:
4/8/2012, Version 1.0.0:
First Release
Friday, June 8, 2012
Lighting preset beta version
Hi all,

Finally here is my python script "Lighting Preset", it allows you to create presets for your lighting ( All lights, cameras and rendering parameters ), save it to a .xml file, load and share easily from a UI in maya !
Works with maya 2011 - 2012 - 2013

Copy the .mel as well as the .png file in your shelves and icons folder for instance on windows:
C:\Users\userName\Documents\maya\2012-x64\prefs\shelves
C:\Users\userName\Documents\maya\2012-x64\prefs\icons
You will have a nez shelf "GJ_Tools" with the lighting preset ("lp") icon.
Or dowload the python script and open it with the script editor: Light Preset Python Script
The script should work on Windows, Mac and Linux, but I cant check version for mac and linux, if someone has a problem just give me a shout, thanks !
Many options available as :
- Save all lights or only selected lights
- Save only rendering parameters
- Save cameras ( Normal cameras only for now )
- Save perspective view in the preset toggle
- Save all presets in the same folder by default to reduce useless manipulations
- Load a preset from an external .xml file
- Create light objects in your scene directly from the .xml preset file
- UI dockable or not
- 3 Presets groups available
- Save preferences in order to keep options setuped as you want, even if you close maya
-...
More help in Help.pdf
Script still in beta, for any problem, drop me an email !
21/07/2012, version 0.3.5:
Minor bugs fixed
UI improvements, now 3 groups are available as preset lists, you can rename these groups by a double-clic on the name or by the UI menu.
18/07/2012, version 0.3.0:
MentalRay Sun and Sky now supported
Cameras/ VrayCam can now be saved( See limitations for Vray cam loading)
Options added like: Help => Checking version online, to see if a new version is available or not.
Debug and Warning modes to see more informations during saving, loading and deleting process.
Few bugs fixed.
12/07/2012, version 0.2.5:
MentalRay IBL is now supported
Bug fix: More maya light attributs are now saved
"Display Warning" option added in the UI menu
11/07/2012, version 0.2.0:
Major bug fixed, you don't have to have Vray installed to save a Preset for another renderer.
12/06/2012, version 0.1.0:
Fix: A proper dialogue pops when you load a renderer preset, asking if you wan to switch to this rendering engine.
Add: "Open preset as text" option in "Presets" menu
11/06/2012 version 0.1.0:
Fix: "Only Selected Lights" now works fine
09/06/2012 version 0.0.5:
First release

Works with maya 2011 - 2012 - 2013
Version in beta, free for download here :
________________________________________________________________________
To use it, you can either install the shelf in the .zip :Copy the .mel as well as the .png file in your shelves and icons folder for instance on windows:
C:\Users\userName\Documents\maya\2012-x64\prefs\shelves
C:\Users\userName\Documents\maya\2012-x64\prefs\icons
You will have a nez shelf "GJ_Tools" with the lighting preset ("lp") icon.
Or dowload the python script and open it with the script editor: Light Preset Python Script
________________________________________________________________________
The script should work on Windows, Mac and Linux, but I cant check version for mac and linux, if someone has a problem just give me a shout, thanks !
Many options available as :
- Save all lights or only selected lights
- Save only rendering parameters
- Save cameras ( Normal cameras only for now )
- Save perspective view in the preset toggle
- Save all presets in the same folder by default to reduce useless manipulations
- Load a preset from an external .xml file
- Create light objects in your scene directly from the .xml preset file
- UI dockable or not
- 3 Presets groups available
- Save preferences in order to keep options setuped as you want, even if you close maya
-...
More help in Help.pdf
Script still in beta, for any problem, drop me an email !
________________________________________________________________________
Version History:
22/07/2012, version 0.3.6:4/08/2012, version 0.4.0:
New option: Save only camera parameters option available when "Save camera param" is ON.
4/08/2012, version 0.3.9:
Minor bug fix: Proper warning message pops when preset is applied to a camera with aim.
25/07/2012, version 0.3.8
Bug fix: Preset file saved with "Only renderer" button works now well on loading.
New feature: Save / Delete / Edit Preferences file, that saves all options : Folder Path, Only selected, Save perspective, etc. even if you close Maya
Minor bugs fixed
UI improvements, now 3 groups are available as preset lists, you can rename these groups by a double-clic on the name or by the UI menu.
18/07/2012, version 0.3.0:
MentalRay Sun and Sky now supported
Cameras/ VrayCam can now be saved( See limitations for Vray cam loading)
Options added like: Help => Checking version online, to see if a new version is available or not.
Debug and Warning modes to see more informations during saving, loading and deleting process.
Few bugs fixed.
12/07/2012, version 0.2.5:
MentalRay IBL is now supported
Bug fix: More maya light attributs are now saved
"Display Warning" option added in the UI menu
11/07/2012, version 0.2.0:
Major bug fixed, you don't have to have Vray installed to save a Preset for another renderer.
12/06/2012, version 0.1.0:
Fix: A proper dialogue pops when you load a renderer preset, asking if you wan to switch to this rendering engine.
Add: "Open preset as text" option in "Presets" menu
11/06/2012 version 0.1.0:
Fix: "Only Selected Lights" now works fine
09/06/2012 version 0.0.5:
First release
Saturday, February 25, 2012
GJ Linear shader for Vray and Mentalray ( Maya )

Here are 2 little Python scripts in order to create automatically shaders with 3 texture files ( Diffuse, Reflection Color and Bump ) as well as 2 gamma correction nodes for Diffuse and Reflection Color.
Select a shader and run the script, if you haven't selected any shader the script will ask you if you want to create a new one.
be carfefull, for the moment the shader works only with Vraymtl and Mia_ shader, not with other shaders ( such as SSS, Light etc. )
TIPS:
By default, the script applies a gamma correction at 0.455, if you want to change this value, before executing the script, type in the Python line in the bottom of maya's UI : gamma_value = "your value" and hit enter. The script will use this value until you either change the value again or re-start maya.
DOWNLOAD :
Tuesday, June 21, 2011
GJ 3 PointsLight for Maya
I decided to work on a version of my Houdini tool GJ 3 PointsLight, for Maya, with Python. So here is the first version in beta, it creates a simple 3 points light rig attributs on the circle shaphe "Controls" ( Color, intensity, shadows, Position etc. ).

UPDATE:
v0.2 (new)
- Positions controls added
v0.1
- More options available like Shadow type, Cone angle, Penumbra, etc.

v0.1 UI
UPDATE:
v0.2 (new)
- Positions controls added
v0.1
- More options available like Shadow type, Cone angle, Penumbra, etc.
Subscribe to:
Posts (Atom)